As promised, here are the cupcake stand instructions. See it back there beyond the coconut yummyness?

You'll need:
- 2 cans
- 3 circles cut out of cardboard (mine are 11, 8, and 5 inches in diameter)
- 3 sheets of 12x12 inch scrapbook paper in a solid color
- 1 sheet of patterned scrapbook paper
- glue gun
- scissors
- ribbon
- spray adhesive
 Start by tracing your cardboard circles on the scrapbook paper, cut those out and prepare to spray them. I only covered one side of the cardboard. There really isn't a need to cover the underneath side of the cupcake stand.
 I made a spray station out of a brown paper bag because I didn't want the adhesive going everywhere. I would recommend you spay outside, but the paper bag is a good alternative if it is a rainy day.
 After all three of your circles are covered set those aside and cover your cans. I covered mine in a patterned paper to add more interest. Here's a tip to make this step easier: line up one end of the can on the bottom edge of the paper and put a pencil at the top of the can. Slowly roll the can to the other side of the paper keeping the pencil at the top and you'll get another straight line parallel to the bottom of the scrapbook paper and perfectly sized to cover your can!
 No need to cover the whole can in glue because you may want those green beans when this whole cupcake party thing is over! I put a line of glue at the end of the paper, wrapped it around then put another line of glue at the other end of the paper. Worked like a charm!
 So here's where you are in the process right now, except that those edges look ratty. Let's cover then in some ribbon.
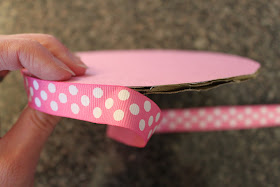
 Using your glue gun, put a line of glue about 3 inches long then place the ribbon on and repeat this process until the top two circles are covered. No need to cover the bottom circle.
 Quick and cheap with a big "wow" factor! Love it!
See more pictures of the stand and the cupcake party baby shower HERE.

I made a giant version of this for my wedding (the bottom circle was 42" with 6 tiers). You're right! It makes such an impact and for practically no cost!
ReplyDeleteGreat job and the cupcakes are adorable!
Fabulous idea! I always want a cute way to display cupcakes but tiered holders can be pricy especially if you want them to match your theme. What a fun project and the cupcakes look yummy too!
ReplyDeleteI will be making some of these next week! Thanks for sharing!
ReplyDeleteWhat a great idea! I love this tutorial!
ReplyDeleteI love it! Thank you for sharing!
ReplyDeleteJust found your blog.. SO CUTE!
ReplyDeleteAdorable! I am so inspired by your whole party! I have filed this at thecraftersfilebox.com
ReplyDeleteHow clever! Canned tomatoes never looked so good. The whole baby shower looks very cute.
ReplyDeleteso simple and yet SO cute! thanks for the tip! xoxo
ReplyDeleteThanks for the sweet encouragement. Email me for the recipes.
ReplyDelete-Sarah
This is adorable! So cute!
ReplyDeleteI love this! I was searching for something fast because my wedding is next Sunday and I really needed to get something, this will be perfect, thanks a bunch!!��
ReplyDelete