
My grandmother gave me a bunch of her really great old embroidery books recently. I know nothing about embroidery, but being someone who is always up for a new challenge I've decided this year I want to learn!

I whipped up a needle book out of scrap ribbon and some felt and I think it's just the ticket to inspire me to start embroidering!

There's no way I'll be able to resist all of these cute little packs of needles tucked away and waiting for me!

- Ribbon scraps (I used 6 different patterns of ribbon)
- Sheet of green felt
- Sheet of white felt
- Masking tape
- Rectangle piece of scrap material (this piece will be completely covered in the end)- cut this scrap the size you'd like your finished book cover to be
 Start by weaving the ribbon into a pattern you like. You may want to use masking tape to hold the ribbon in place. Then you'll sew the ribbon down. I chose to sew all of the vertical pieces of ribbon. There's no need to sew both the horizontal pieces and the vertical pieces, so just choose which way you'd like to go.
 Here's the sewing technique that's the fastest: Start with your needle on one side of the ribbon and sew down that one side.
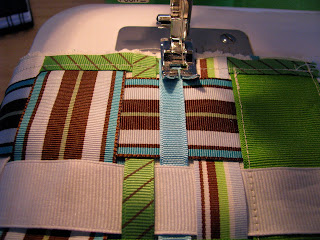 Then keep your needle down in the fabric like in the picture below. Turn your project and sew down the other side of that ribbon. Keep going until you have sewn down each of the vertical (or horizontal) strips of ribbon.
 Lay your completed ribbon masterpiece on top of a piece of felt that has been cut with a 3/4 inch overhang. This felt will serve as the inside of your needle book and the edge that binds off the ends of the ribbon strips.
 Pin it down and sew the edge of the felt around the perimeter of the project, leaving the corners unsewn because I have a little something special in store for them!
 Once you've sewn the edges fold down the corners so they look like this and hand stitch the corners down. I used a whip stitch.
 Ta-da! Cute corners!
 Next, pull out your pinking sheers and cut two pieces of white felt for the book's "pages." Find the center of your book's cover and aline it with the center of your pages. Sew down the center to secure the pages.
 Finally, grab your button of choice out of your favorite button storage cabinet!

 Happy stitching!
 Then keep your needle down in the fabric like in the picture below. Turn your project and sew down the other side of that ribbon. Keep going until you have sewn down each of the vertical (or horizontal) strips of ribbon.
 Lay your completed ribbon masterpiece on top of a piece of felt that has been cut with a 3/4 inch overhang. This felt will serve as the inside of your needle book and the edge that binds off the ends of the ribbon strips.
 Pin it down and sew the edge of the felt around the perimeter of the project, leaving the corners unsewn because I have a little something special in store for them!
 Once you've sewn the edges fold down the corners so they look like this and hand stitch the corners down. I used a whip stitch.
 Ta-da! Cute corners!
 Next, pull out your pinking sheers and cut two pieces of white felt for the book's "pages." Find the center of your book's cover and aline it with the center of your pages. Sew down the center to secure the pages.
 Finally, grab your button of choice out of your favorite button storage cabinet!
Sew the button on the front and finish with an elastic loop to keep your needle book closed in style!
 Happy stitching!
4 comments:
Great tutorial! You make everything look so easy! :P
Happy Monday! x
Wow, I love what you did with the ribbon, that's fabulous! Thanks tons for the tutorial. I'll be linking.
So pretty! I don't do much hand-sewing or embroidery, but love making needle-books, for some reason. :) Thanks for posting this...
I've been needing a place to store all my needles so they don't get lost. This is just the thing. Thanks for the great idea.
justenoughstyle.blogspot.com
Post a Comment