
How familiar is this scene: You're in the car about to drop off your dry cleaning and you want to make a quick note of just how many of your precious shirts you're dropping off. You look around and there's not a scrap piece of paper anywhere.
 So you grab one of the scarce "just in case" napkins from your glove compartment and scratch out a note to yourself. Wouldn't it be nice to have a cute little scrap pad close by for times like these?
I thought so too, so I made these using recycled materials. And here's a tutorial just for you. You'll need:
- Ultrasuede samples (but you could use any fabric really, mine are about the size of a business card)
- Recycled paper (think: an old book you could cut up, junk mail, etc.)
- Ribbon scraps from old projects
- Glue
- Sewing machine
- Size 110/18 needle (for heavyweight fabrics)
When a new line of fabric comes in sometimes fabric stores will sell the discontinued fabric samples. (Just ask!) That was the case with this ring of multi-colored ultrasuede swatches.

These colors are beautiful and I had the best time pairing them up for my little scrap pads. I think ultramarine and cardinalle is my favorite pairing (great names!).

For the scrap paper, I used leftover book pages from this project, cut just a little smaller than the ultrasuede "covers." Be sure to change out your sewing machine needle! Usually I use a size 90/14 needle, but I switched to a 110/18 size for this project. The thicker needle won't break as easily. (Also, set your machine to make tight stitches, longer stitches will pull out.)

Once you have your two "covers" and scrap paper inserts in place, use a binder clip to secure it all together on the side you won't be sewing. Next, use a pencil to mark a line on the edge of the paper where you would like your seam to go.
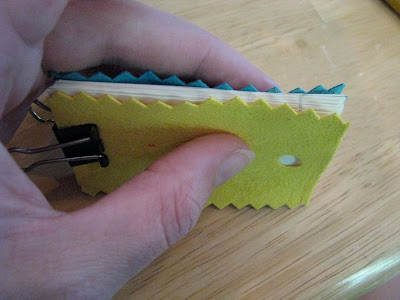
I wanted my scrap pads to be thicker than my machine was happy sewing for me, so I split the pad in half and stitched the two halves separately. That's where your little pencil line comes in handy. Make sure your needle is lined up with that line and stitch half of your book...

then the other half.

My ultrasuede covers already had a hole punch in them, so I decided to punch the paper too.

Then I glued the front and back sides of the pad together in the middle, keeping the glue above the seam.

I finished the pad off with a piece of curly grosgrain ribbon. You know what I love about these pads? Because we sewed them together, they have a nice perforated edge that makes tearing the sheets off so easy!

There you have it! Scrap pads never looked so good!

P.S. I've added lots of new projects to my list of "Projects I Want To Attempt" over there on the right column. One of them gives you a clue to the dowel rod, fabric and magnet project I'm currently working on! Can't wait to show you!
2 comments:
i love it! what a genius idea for those fun little scraps! they would make great needle books with felt pages too. fun re-use!
can i use your photograpy in my blog for personal purpose? I'm a Korean and i just want to explain what i did in company. (fabric R&D)
Post a Comment