Showing posts with label Tutorial. Show all posts

Friday, February 1, 2013

3 Easy DIY Baby Gifts

1. Easy Embroidery
Embroidery projects are so easy and rewarding. (A great couch project for when you're on bed rest, just sayin'.)  You don't need to know any fancy stitches to make a beautiful piece that you'll admire in your nursery for years to come.  I used this pattern from Amy Bindel.  It is no longer on her blog, so you'll need to print it from the pin if you're interested in using it.  Really you can use any drawing, just trace it lightly with a pencil on to your fabric and stitch over your markings.  
I have a lot of great resources on my Sewing Pinterest page for free embroidery designs and basic stitches.  Have fun with it, throw the embroidery rules to the wind and just stick that needle in the fabric and get started, I promise you'll thank me.

2. Baby Booties
Are you totally sick of my gray felt and pink bows yet?  I can't walk up the stairs a bunch, so I've got to squeeze every bit of creativity out of the supplies I have within reach.  I promise, there's only one more project I want to show you with my 68 cent sheets of felt, but I'll wait until Laney is born to reveal that one! :)  On to the current project... baby booties!
I used Tao of Craft's Modern Baby Bootie Tutorial to make these, but I did it with felt.  If I made these again I would definitely double up the felt to make it more sturdy or use leather like my Little Man Shoes from forever ago, remember those?!

3. Paci Clip
These are just the easiest to make, and don't you love this ruffly ribbon?!  Tutorial here.

Friday, January 25, 2013

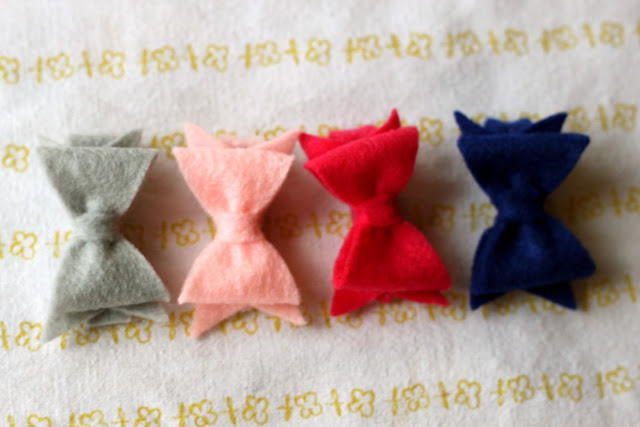
How to Make Felt Hair Bows that Stick!

Please visit the updated post and find lots more inspiration here.
Finally, a hair bow that will stay in your little girl's hair when she doesn't have any!

I don't think I finally got hair until I was about 2 or 3 years old.  I'm sure my mom fielded a bunch of "How old is your son?" questions, and I'm anticipating the same for my little girl.  Since she's not here yet (anticipated c-section birthday on Feb. 25) you'll have to settle for me as a model. 
I did a bunch of research on which clips were the best and the secret trick to making the hair bows stay in.  You'll never guess what it is!  Drawer liner!

Let's get started!
You'll need:

Have I told you before that I'm not very girly?  I'm not in to ballerinas and tutus and tulle.  No thanks.  When I was little I had a Mr. T lunch box.  Yes, the huge guy from the A-Team who didn't like to fly on airplanes and wore about 10 lbs of gold chains around his neck, yeah him.  I was obsessed.  Anyway, I inherited these hair clips and cut off the tulle so I could re-use the perfectly good clip underneath.  You could also buy the metal clips at Sally's Beauty Supply or I've even seen them at Michael's.
Once I freed my hair clip from all that ick I was ready to get started.  

Cut a strip of felt that's as wide as your clip and long enough to wrap around starting where my thumb is and continuing around the whole top portion of the clip.  It's key not to have any felt on the bottom of your clip because you want that part of the clip to be in contact with the hair directly.  Glue that down.  Be sure to open your clip so that you don't glue the clip closed.
Round off any excess felt.
Next, cut a piece of drawer liner that's as wide as your clip and as long as the inside top portion of your clip (remember we want to keep the entire bottom part of the clip clear of anything.)
 Trim off the excess shelf liner.
 It will look like this when you're done.
 Finally, hot glue your bow to the top of the clip and you're done!
Repeat until you're sick of making them or until your thumbs can't take any more hot glue gun burns, which ever comes first.
If you'd rather make these using grosgrain ribbon, Make It and Love It has an awesome tutorial and some sticky sweet baby pictures here.
Now you moms of girls will have to tell me how you like these.  Bonus points if you can remember any other characters from the A-Team!  I love it when a plan comes together!

Sunday, January 20, 2013

How to Make An Elephant Doorstop (that's too cute for the floor!)

Please visit the updated post and find lots more inspiration here.

Can I show you how to make an elephant doorstop that's bursting with so much cuteness you won't want to put it on the floor?
The plan for this sweet thing was to have her hold my little girl Laney's door open, but the thought of kicking it out of the way every time I wanted to close the door made me change my mind... Miss. Elephant is now safely perched on top of Shel Silverstein on the bookshelf and far away from our feet.  Are you relieved?  I am.
Wanna make one?
You'll need:

  • This pattern for the elephant
  • This pattern for the bow
  • Gray felt
  • Pink felt
  • Decorative scrap fabric
  • Needle, embroidery thread and scissors
  • Straight pins
  • Plastic can gripper (that's my secret weapon!)
  • Pebbles
  • Stuffing

First, you'll want to print this pattern (landscape-style at 250%) and piece it together.   I always like to give credit where credit is due, but it was super hard to find out who originally created this pattern.  One source said it was from an old Family Fun magazine, so we'll go with that.

Use the pattern to cut each of your pieces out of felt.  For the ear pieces, I cut two pieces out of fabric a little larger than the pattern so that I could turn it under before stitching, and two pieces out of felt (for the backs of the ears).**

Now the fun part!  Piece the gray felt pieces together and pin them in place. Start whip stitching the elephant together (I started at the back of the elephant's heel and went up towards the butt.)  If you don't know what whip stitching is, check out this youtube video.  (You're going to thank me for the awesome music!)
One quirky thing about the elephant pattern is that it didn't include a tail pattern piece so I made up my own.  I just cut a rectangle piece of felt about an inch or so wide and about 2.5-3 inches long.  I snipped the ends of one of the short sides of the rectangle and then rolled the felt up, whip stitching the roll closed.  The picture above should help you.

The picture below is how I pieced the tail in.  You're looking at the inside of the elephant's butt.
Keep whip stitching around the rest of the elephant.  When you get to the trunk be sure to put in some stuffing WHILE you stitch it closed.  It will be super hard to get the stuffing in there if you don't do it this way.
Now for my secret weapon... pull out that freebie can gripper that you got at the fair (the flexible plastic one) and use it to grip your needle when it gets really hard to pull it through two layers of felt and the fabric on the ears.  Works perfectly doesn't it?!

**Be sure to follow my above instructions about the ear fabric.  If you cut the fabric a little larger than the felt then you'll have space to turn the fabric under before you stitch it to the ear backs (made out of felt).

One more important note... TRUST THE PATTERN!  While you're stitching, line up the pattern pieces you cut perfectly, don't start making adjustments to the pattern while you're stitching because you think it's not lining up correctly.
When you're all done stitching the elephant the underneath will have an open flap for stuffing.  Put the stuffing in first (just a bit in the bottom of the feet too) then fill in the rest of the legs and the underneath belly with pebbles for weight.  

If you're not planning on using your elephant for a door stop or a book end, just omit the pebbles and use only stuffing.
 As a finishing touch, I embellished with a pink bow using this pattern.


 Can't wait to show you the rest of Laney's room!  We're aaaaallmost done.

Friday, November 23, 2012

How to Wear Your New Scarf

So you've bought a new scarf from the Create Studio Shop.  Yay!  
Mind if I give you a quick tutorial on how I like to wear mine?

First, give the scarf a light stretch between your hands.
 Slip it over your head with the portion that rolls up on the outside.
 Pull the bottom roll down slightly.
 Then pull the portion between the two rolls out and down.
 So that's how I like to wear my scarf.  I also think it looks good inside out for a different look.  
How do you wear yours?
(Scarf shown is the Citron color, one of my favorites!)

Monday, September 10, 2012

DIY Dinosaur Party Favors

Please visit the updated post and find lots more inspiration, here.

Trey boy turned two a couple of weeks ago.  Now I don't know about you, but most two year olds I know are not exactly in to anything on their own apart from whatever their big brother's are in to, so a little bit of a guessing game on my part was in order.  All of Trey's latest library book choices have been dinosaur clad, so I went with it!

Can I show you how I made the party favors?  First, I used Jill's tutorial and made the printables on PicMonkey (the best free alternative I've found to Picnik... RIP Picnik!)  I get so many emails for my printables.  I'm happy to share what I've made, but I'm telling you, it is so super easy to make them on your own, then you can customize the colors to your own party.  Mine says, "Roar! Please eat some more!"

If you want to make something similar you'll need:
  • Spray paint
  • Baby food jars
  • Small plastic dinosaurs
  • E-6000 glue
These little guys were so cute and colorful, but we're about to spray 'em, sorry.
First you'll want to go outside, wear a mask, gloves, hold your breath and pray, then unscrew the glue top.  A large fan wouldn't be overkill either.  I'm only kidding, but have you ever read the back of the E-6000 glue?  It's like signing your life away.  I should have taken a picture of it.  They'll put the fear of God in you, but it sure does work well.  Glue the dinosaurs to the metal baby food jar lids.

I couldn't help but let out a few roars back at these little guys, so you may want to do this by yourself for fear that someone will think you've been abusing that glue... just sayin'.
Remove the tops from the glass jars and give them a few coats of spray paint then you're all done.  I filled mine with M&M's and a couple more plastic dinosaurs that had been washed well.  Can't wait to show you the rest of the party pics!


Wednesday, August 22, 2012

Vintage Stencil Signage Tutorial

**Please visit the updated post, and find lots more inspiration here.

I inherited these great vintage yellow stencils from my husband's grandmother.  We helped her clean out her house and while everyone went for the china and furniture I went for the real treasures!!  Sewing notions, broken watches, old letters, vintage sheets, hankies and linens with a story. That's more my style, I love things with a history.  Anyway, back to the stencils.  They are a great mustard color and sturdy card stock.  You can find something similar here.  Here's what you'll need to make your own sign:
  • 3 inch tall card stock alphabet stencils
  • 1 fat quarter of your favorite fabric
  • Spray adhesive 
  • Sewing machine with colored thread
  • Thick yarn (I used Wool Ease Thick and Quick)
  • Glue gun

First, flip the stencils over to the "wrong side" and give them a good coating of spray adhesive.  I recommend doing this outside, but since it was a rainy day I decided to make a tent out of an old bag to catch the excess spray.  Take my word for it after lots of countertop scrubbing, you don't want to skip this step!
Next, press your coated stencil on to the "right side" of your fabric and cut off the excess fabric.  Repeat this step with each letter you plan to use for your sign and set them aside to dry.
Once the stencils are dry (wait for this because nobody wants spray adhesive gunk in their sewing machine) you can do a zig-zag stitch all the way around the edge of your stencil.  Be sure that you don't pick up your needle as you turn the corners so that you don't have excess fringe on the corners.  What you'll want to do is keep your needle down as you approach the corner, lift your presser foot, turn the stencil, then put your presser foot down and sew down the next side until you're done.
You're almost done!  Finally, you'll want to place all of your finished stencils down from right to left and hot glue some yarn to the top of each stencil, leaving about 4 inches of yarn on each end for hanging.
 Looks like this from the back side:
 And this from the front!
 And it looks like this catching lots of natural light from behind!
There's lots more pictures of the sign here.  Happy Crafting!