Showing posts with label Sewing. Show all posts

Friday, February 1, 2013

3 Easy DIY Baby Gifts

1. Easy Embroidery
Embroidery projects are so easy and rewarding. (A great couch project for when you're on bed rest, just sayin'.)  You don't need to know any fancy stitches to make a beautiful piece that you'll admire in your nursery for years to come.  I used this pattern from Amy Bindel.  It is no longer on her blog, so you'll need to print it from the pin if you're interested in using it.  Really you can use any drawing, just trace it lightly with a pencil on to your fabric and stitch over your markings.  
I have a lot of great resources on my Sewing Pinterest page for free embroidery designs and basic stitches.  Have fun with it, throw the embroidery rules to the wind and just stick that needle in the fabric and get started, I promise you'll thank me.

2. Baby Booties
Are you totally sick of my gray felt and pink bows yet?  I can't walk up the stairs a bunch, so I've got to squeeze every bit of creativity out of the supplies I have within reach.  I promise, there's only one more project I want to show you with my 68 cent sheets of felt, but I'll wait until Laney is born to reveal that one! :)  On to the current project... baby booties!
I used Tao of Craft's Modern Baby Bootie Tutorial to make these, but I did it with felt.  If I made these again I would definitely double up the felt to make it more sturdy or use leather like my Little Man Shoes from forever ago, remember those?!

3. Paci Clip
These are just the easiest to make, and don't you love this ruffly ribbon?!  Tutorial here.

Sunday, January 20, 2013

How to Make An Elephant Doorstop (that's too cute for the floor!)

Please visit the updated post and find lots more inspiration here.

Can I show you how to make an elephant doorstop that's bursting with so much cuteness you won't want to put it on the floor?
The plan for this sweet thing was to have her hold my little girl Laney's door open, but the thought of kicking it out of the way every time I wanted to close the door made me change my mind... Miss. Elephant is now safely perched on top of Shel Silverstein on the bookshelf and far away from our feet.  Are you relieved?  I am.
Wanna make one?
You'll need:

  • This pattern for the elephant
  • This pattern for the bow
  • Gray felt
  • Pink felt
  • Decorative scrap fabric
  • Needle, embroidery thread and scissors
  • Straight pins
  • Plastic can gripper (that's my secret weapon!)
  • Pebbles
  • Stuffing

First, you'll want to print this pattern (landscape-style at 250%) and piece it together.   I always like to give credit where credit is due, but it was super hard to find out who originally created this pattern.  One source said it was from an old Family Fun magazine, so we'll go with that.

Use the pattern to cut each of your pieces out of felt.  For the ear pieces, I cut two pieces out of fabric a little larger than the pattern so that I could turn it under before stitching, and two pieces out of felt (for the backs of the ears).**

Now the fun part!  Piece the gray felt pieces together and pin them in place. Start whip stitching the elephant together (I started at the back of the elephant's heel and went up towards the butt.)  If you don't know what whip stitching is, check out this youtube video.  (You're going to thank me for the awesome music!)
One quirky thing about the elephant pattern is that it didn't include a tail pattern piece so I made up my own.  I just cut a rectangle piece of felt about an inch or so wide and about 2.5-3 inches long.  I snipped the ends of one of the short sides of the rectangle and then rolled the felt up, whip stitching the roll closed.  The picture above should help you.

The picture below is how I pieced the tail in.  You're looking at the inside of the elephant's butt.
Keep whip stitching around the rest of the elephant.  When you get to the trunk be sure to put in some stuffing WHILE you stitch it closed.  It will be super hard to get the stuffing in there if you don't do it this way.
Now for my secret weapon... pull out that freebie can gripper that you got at the fair (the flexible plastic one) and use it to grip your needle when it gets really hard to pull it through two layers of felt and the fabric on the ears.  Works perfectly doesn't it?!

**Be sure to follow my above instructions about the ear fabric.  If you cut the fabric a little larger than the felt then you'll have space to turn the fabric under before you stitch it to the ear backs (made out of felt).

One more important note... TRUST THE PATTERN!  While you're stitching, line up the pattern pieces you cut perfectly, don't start making adjustments to the pattern while you're stitching because you think it's not lining up correctly.
When you're all done stitching the elephant the underneath will have an open flap for stuffing.  Put the stuffing in first (just a bit in the bottom of the feet too) then fill in the rest of the legs and the underneath belly with pebbles for weight.  

If you're not planning on using your elephant for a door stop or a book end, just omit the pebbles and use only stuffing.
 As a finishing touch, I embellished with a pink bow using this pattern.


 Can't wait to show you the rest of Laney's room!  We're aaaaallmost done.

Tuesday, June 26, 2012

My Day at the Original Sewing and Quilt Expo

The Original Sewing and Quilt Expo came to Raleigh for the first time last week.  This is the Raleigh Convention Center where it was held.  I couldn't be more proud of my city! The oak tree is made of thousands of tiny aluminum tiles that shimmer and seem to change shape when the wind blows.  It's really gorgeous.  Here's a video.
There were tons of exhibitors, stage presentations, make and take projects, classes and some pretty well-stocked studios where you could try out the latest sewing machines, tools and notions that may not have even hit the stores yet.
I was more than a little bit giddy to be there!  I may have even laid out my outfit the night before and made that necklace just for the occasion.
There were fabrics in designs I had never seen.  Like those from H & W Fabrics.  The shop owner, Robert, is a seasoned expo expert so he gave me tons of great tips and things to think about for my show.  (If you follow me on Pinterest this is no surprise, but I'm going to do my first real craft show in November!)
One of my favorite booths was Some Art Fabric.  Colleen Casey and her hilarious brother ran the booth.  I wish I had taken a picture of the two of them, they were quite the dynamic duo.  He is a burly man's man wearing a homemade shirt covered in sewing scissors (homemade by himself!) and she's a bubbly class instructor (I will definitely be taking a class from her next year!)  Their booth was stocked with ultra unique fabric (think, Day of the Dead stuff), patterns and handmade things.  They made these journals out of Golden Books together:
 And Owl kits out of recycled felted sweaters!
Another thing I really liked about them, aside from the way Colleen's brother spoke so highly of her, was that they didn't sell a pattern they hadn't made themselves with samples right there in their booth.  Check out this Melly and Me pink flamingo.  Awesome!
And I love this children's garment bag! 

Believe it or not, there were actual quilts at the Quilt Expo... shocker, right!?  I just sorta stood there and stared at this one for a while.  It's called "Dare to Live Your Dreams" by Lynn Dell Swapp from Utah. (Is it just me or have you noticed that all amazing crafters are from Utah?)
Need a close up of that detail?  Look at those shingles.  I would probably have a hissy fit getting each of those just right.  My goodness!  And the "turned" banisters... that's amazing!  Lynn, I want to give you a high five!
Here's another one that caused me to gawk.... err, hoot.  It's called "Hoodies Owl on Green Tree" by Hoodie Crescent from New Jersey.
 People, I couldn't have said it any better myself...
After seeing all of that amazingness I needed to put my hands on some fabric.  Perfect timing... as I turned the corner there was the booth for my most favorite fabric store in Raleigh... Wish Upon a Quilt.  I need to head over there one day and do a whole blog post about them.  I have to suppress a squeal every time I walk in there and you all NEED to see a picture of what I'm talking about.

I met the cutest lady who works at Wish Upon a Quilt.  She and her 92 year-old Uncle Bob make these miniature ironing boards together, the Lil Buddy Pressing Board.  He cuts the wood and she sews the reversible covers.  Great for a small craft room!

Wish Upon a Quilt never disappoints with their selection of fabric.  Cathy had just returned from Quilt Market (By the way, that's on my bucket list... Quilt Market and Gift Market and I want to see a whale, I digress...) and she had tons of great new things.
I loved how eager everyone was to share their skills and techniques.  Quilting requires so much patience and time.  It could quickly become a lost art if someone isn't willing to take the time to teach.
I came away from the Expo learning a lot about some things I wasn't expecting.  I wore my necklace and carried my camera, which made me stand out a bit.  I was given the opportunity multiple times to speak to what I write about on my blog and what I make... things I'd usually much rather type about than talk about.  Armed with a back pocket full of business cards I would hand them out to anyone who asked about my camera and my necklace.  At the end of the day I'd almost given away every one of them!  Funny, I gained so much confidence realizing that my blog is legitimate and the things I make are both admired and desired by others.  I like moving my online passions in to "real life" conversations and interactions.  It gets me so excited for November!  Yippee!!
Thanks for coming to Raleigh, Original Sewing and Quilt Expo!
 I'll be the first one in line again next year!

Monday, June 11, 2012

Finished! Kitchen Curtains.

Happy Monday, my friends!  I hope you had a productive weekend!  I got to cross a biggie off of my list... the kitchen curtains!  Now don't tell anyone I know how to make curtains... can we keep this our little secret?
Custom box pleat valances for a bay window require more than my year's quota of math.  Whew, it was the biggest relief to mark those off the list!
 I'm pretty sure I can conquer the world now with this one under my belt!
I hope to show you the rest of the kitchen with all of the before and after pictures soon, sorry to keep you waiting.  We're still waiting on a rug for the dining room that has been back ordered, but you can see some of the other things we chose on my Pinterest Kitchen page until then.

Friday, December 23, 2011

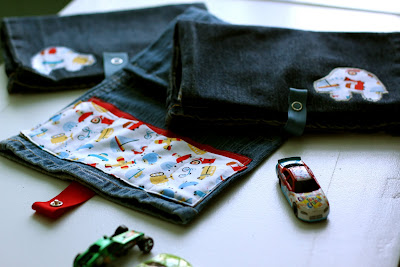
Toy Car and Crayon Clutch... Part 2

It's been a while... remember these?
It holds four toy cars, eight crayons and the attention of your active little man while you're out and about.
Now I'm gonna throw a ton of pictures at you, hold on. I just got a new camera lens for Christmas and these little clutches were so sweet to pose for me.
Heather, these are coming your way. I hope the little guys in your life love them.